As a content creator, it is extremely important to have good audio (we’ve said it time and time again!). Individuals can handle a 720p stream, but they can’t handle choppy audio that grates at their ears!
There are many tools a creator can use to dial in their audio. You can buy a better microphone, use OBS filters to limit the audio output, or implement audio interfaces into your setup. A while back, we discussed how the GoXLR mixer is a stream tool we never knew we needed. It is so versatile and provides a lot of functionality to make your audio perfect. A lot of you agreed and picked up this amazing audio interface yourself!
However, one of the biggest confusions came with the GoXLR app. TC Helicon did a great job of streamlining the setup process, but there’s a lot of extra features of the GoXLR app that are briefly discussed and could use some clearing up. So today, we are going over the entire GoXLR app and all of the awesome features it has to make you sound great. Let’s dive in!
GoXLR App Overview
*We are going to assume you’ve purchased the GoXLR or GoXLR Mini audio interface, plugged it in, and are ready to set up.
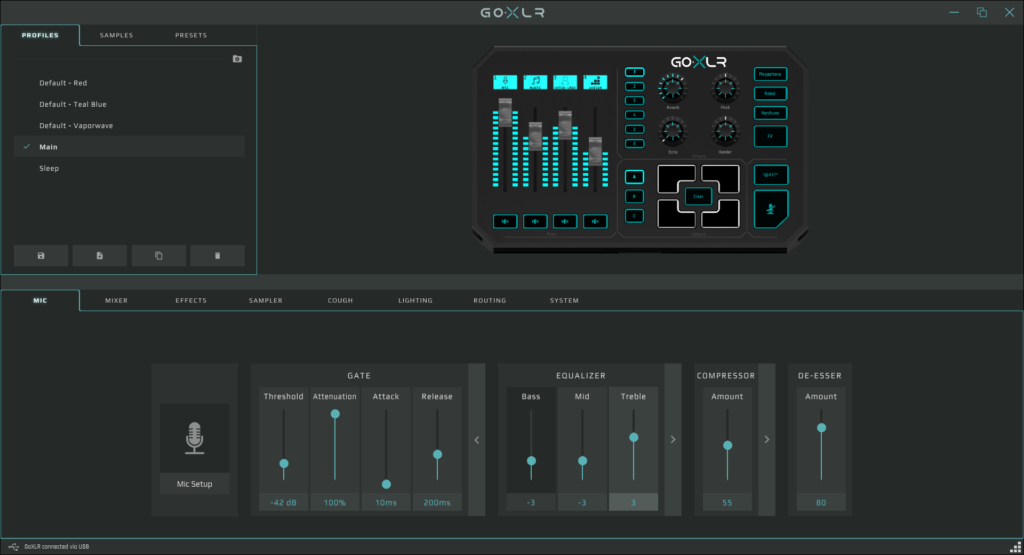
The GoXLR App is the controller that drives the audio mixing on your GoXLR and within your computer system. The app is split into 8 tabs that control things like your microphone, lighting, and more.
If you want different audio mixes for different applications, you can create specific profiles in the GoXLR App that will adjust the levels on the fly. Please note that the microphone levels can only be set once and will not change as you switch between the profiles.
Now that we have a general understanding of the GoXLR app layout, let’s go over each of the tabs and the different actions you can take in each.
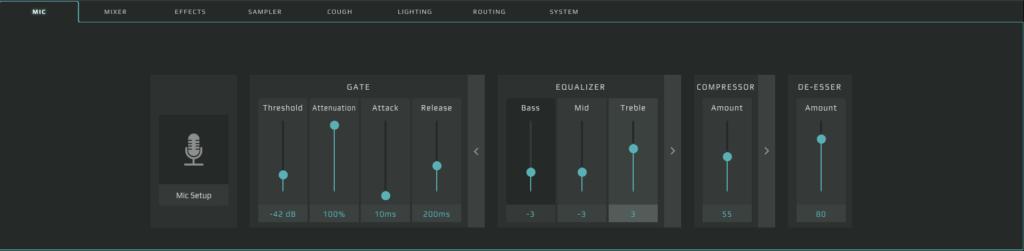
Mic
The Mic tab houses everything to do with your microphone. This is where you’ll set up your microphone for the first time, change the way it sounds, and get it set to your own voice.
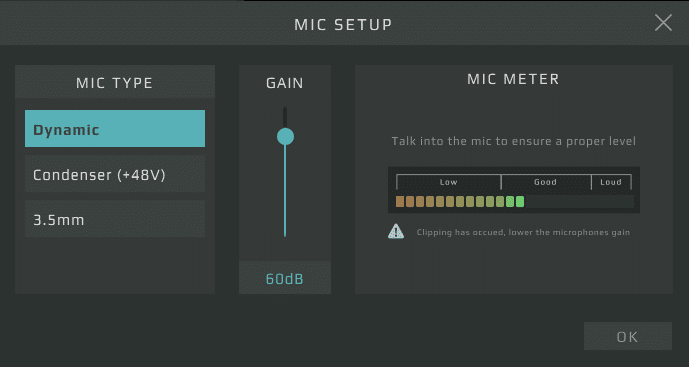
To get started, you’ll click on the “Mic Setup” box on the far left. You’ll need to know if you are using a Dynamic, Condenser, or 3.5mm microphone. Consult with your microphone manufacturer if you are unclear on the type of microphone you have.
- Dynamic: Best used with booming sounds or louder environments. Does not require batteries or phantom power.
- Condenser: Best used to capture vocals and high frequencies. Requires batteries or phantom power to work.
- 3.5mm: Typically a microphone from a headset or a USB that is connected with an adapter.
Select the Mic Type you have and adjust the Gain so that the Mic Meter falls into the “Good” range.
Once you’ve set up the mic, you can now adjust the mic settings like Gain, Compression, etc. Most of the time, the settings you’ll use for your voice will be different than what someone else will use. That’s why we can’t give you specific numbers for the Gate, Equilizer, Compressor, and De-Esser. We included a setup video below that sets a good baseline for these different categories and then you can tweak it to your own specific voice.
Note that you can click the “right arrow” next to the different categories to open additional settings (i.e. If you click on the arrow on Gate, it will allow you to change Threshold, Attenuation, Attack, and Release).
Mixer
The Mixer tab is where you’ll set up what the faders (the sliding tabs on the unit) control and the mixing of all the audio sources.

The first section of the Mixer tab focuses on the faders. This is where you’ll assign the different audio sources to the 4 physical faders. Please note that while you only have 4 physical faders, you can control all audio sources and their levels in the GoXLR App. We recommend putting the 4 most used audio sources in your setup on those physical faders.
Both units can assign different outputs to the different physical faders. So if you have a GoXLR Mini and want the Mic fader to control your game audio instead, you can do that. It’s just easier to label with the GoXLR.
The next section is how the mute button works on each fader. You can set it to mute all of the source audio, mute only to stream, etc.. We recommend for beginners to set it to Mute All. However, as time goes on, you may find that you want to adjust it to how you interact with your stream.
The final section is the Mixer panel that allows you to adjust the audio levels for each audio source on your pc setup and any going into the GoXLR. This includes any game systems, Line In, and more. We recommend going through each audio source, with audio running, so that you can get the correct percentage for each source you use. This will be different for each person.
Effects
If you have the GoXLR Mini, you will not be able to apply effects to your voice. Effects only work with the full GoXLR audio interface.
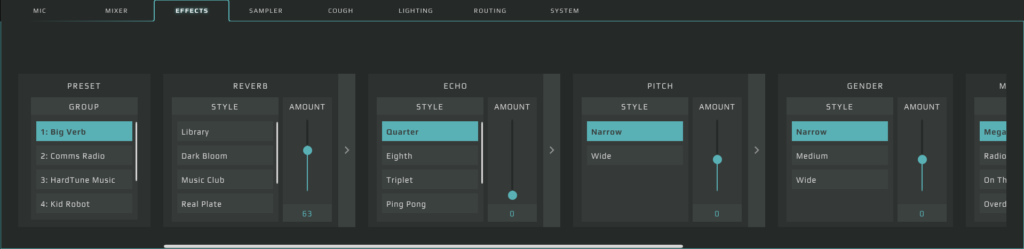
The Effects tab allows you to adjust the Reverb, Pitch, Echo, and Gender of your voice. You can create 6 different presets and apply a multitude of different effects to them. To make them work, just click on the FX button on the GoXLR. Click the FX button again to turn off the effect.
In this section, you can also apply general effects by pressing the Megaphone, Robot, and Hardtune (or autotune) buttons. You’ll click on the button you’d like to use and then click the FX button to ensure that it is on.
Sampler
If you have the GoXLR Mini, you will not be able to play sampled sounds. This only works with the full GoXLR audio interface.
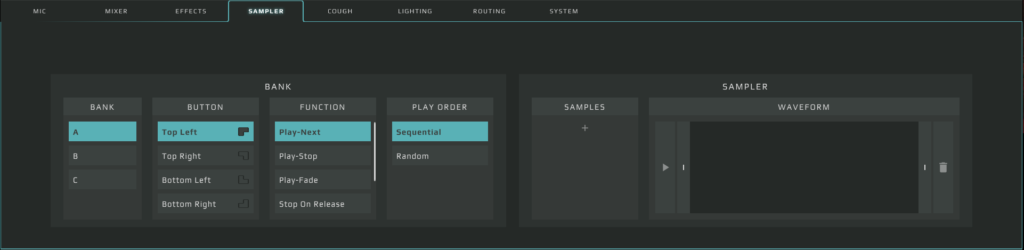
The Sampler tab houses sound effects that you can play with the click of a button. These can be .mp3 files or recorded from you. The Sampler is broken down into three buttons: A, B, and C. Next to these buttons are a set of 4 buttons where the sound effects live. By clicking on A, B, or C and then then the sound effect button you want, you can load up to 12 different sound effects onto the Sampler.
To record a sound for the Sampler, just press down and hold on the button that you want to assign the sample to, talk into the mic, and release when finished.
To apply a .mp3 file to one of the Sampler buttons:
- Go to the GoXLR App and select the Sampler tab
- Choose the Bank (A, B, or C) you’d like to house the sample in
- Choose the Button you’d like the sample to be applied to
- Go to the Samples box and select the “+” icon.
- The Windows File Explorer window will open where you can locate the .mp3 file.
- Select the file and it will apply the sample to the button.
- The Waveform section allows you to trim the sample if you want to shorten it.
We included a quick video tutorial to visually go over these actions as well.
Cough
The Cough tab is very simple. This is where you adjust the settings for the Cough Button (denoted with a microphone that has a line through it on the GoXLR unit).
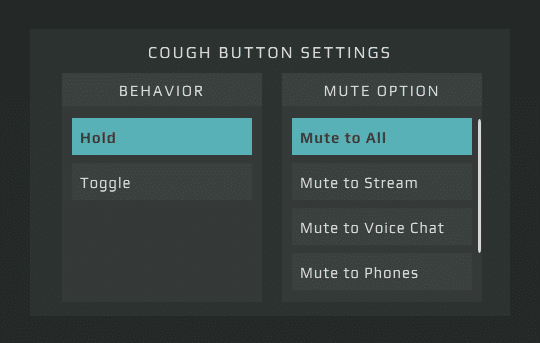
You can set the Cough button to be toggled on or just held down to activate in this area too. While you can adjust the mute options here and where the sound is muted, we recommend keeping it Mute to All, which ensures it locks out all sound to everyone.
Lighting
Like the Cough tab, the Lighting tab is where you apply the lighting effects to each area of the GoXLR, whether it be the faders, effects, mute button, etc.
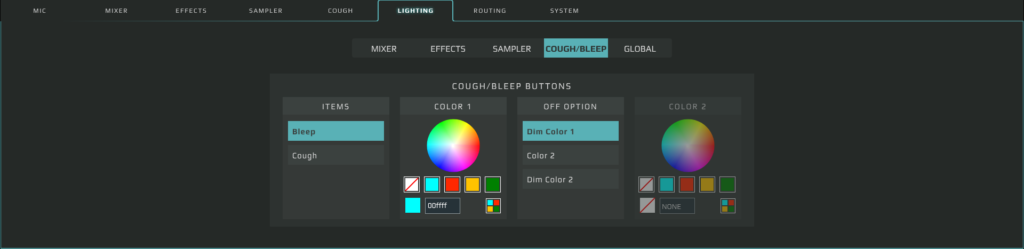
The GoXLR allows you to change the photo and name of the faders, while the GoXLR Mini has the words Mic, Chat, Music, and System printed right onto the unit. They cannot be changed.
Routing
The Routing tab houses one of the most powerful features in the GoXLR App, but also the most confusing. This is where you can decide what audio sources are played to each input and output.
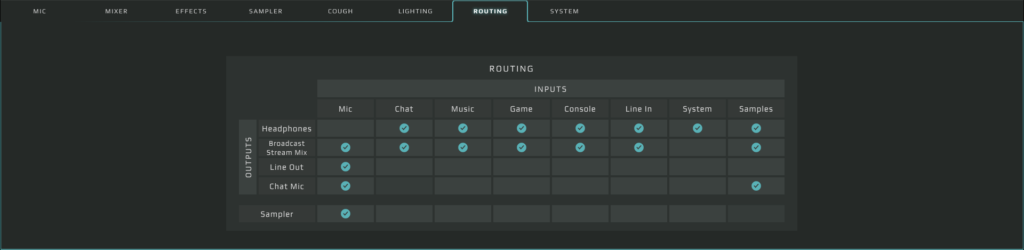
Being able to route audio is very powerful and actually provides protection to the creator.
For example, because of Twitch’s DMCA takedowns, all streamers should be avoiding copyright music on their streams. However, some creators still want to listen to music, but not have their stream hear it. By using the Routing board, they can set their Spotify as a Music input and uncheck it to the Broadcast Stream Mix output. That will ensure that they can hear it in their headset, but their stream will not.
This also helps if you don’t want to hear your microphone in your headset. Just uncheck the Mic input on the Headphones output.
System
The System tab goes over the software updates, additional tutorials, third party info, analytics, and other settings of the GoXLR system.
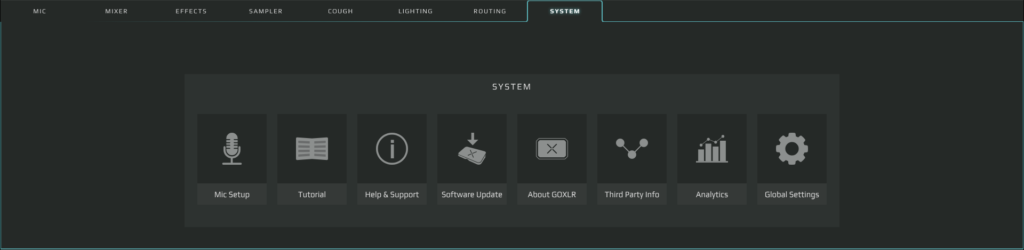
One overlooked feature is that the GoXLR can pair with the Stream Deck via a free Stream Deck plugin. Once installed, you can do actions like changing profiles or even toggling audio inputs and outputs via the Routing Table with the click of a button.
In the Systems tab, under Global Settings, you’ll find a spot to connect and reconnect to the Stream Deck app.
Integrating the GoXLR Into Other Software
Once you’ve adjusted the settings in the GoXLR app to your liking, you’ll want to add the GoXLR settings to your third party software like OBS. Luckily, this is one of the easiest steps in the entire process.
We are going to use OBS for this, but it can be applied to other stream programs like Streamlabs Desktop (previously Streamlabs OBS).
- Open OBS
- On the right sidebar (under the preview window), select Settings. The settings window will open up.
- On the left sidebar, select Audio.
- In the Global Audio Devices section, go to Mic/Auxiliary Audio and select Broadcast Stream Mix (X- TC-Helicon GoXLR).
- The “X” next to X- TC-Helicon GoXLR will change depending on the number of times you change locations of the USB of the GoXLR on your computer. You’ll start with 1, but if you change USB ports, it will change the number. The number changes do not affect how the GoXLR works.
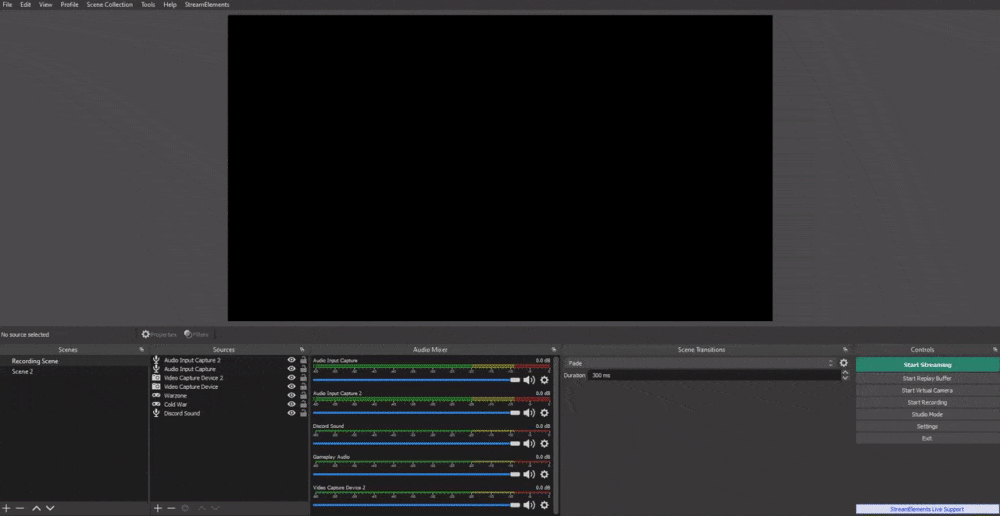
This will now create a single audio source within OBS. Now, all of the audio mixing will run through the GoXLR audio interface. If you use the fader to turn your mic down, the mic volume will go down in OBS. No more messing with OBS sliders for the audio levels!
If you plan to record content and want to have individual audio tracks for mixing in post production, GoXLR also provides differentiated audio inputs that you can select. For example, you can create audio input captures for Chat Mic (X- TC-Helicon GoXLR), Game (X- TC-Helicon GoXLR), and Sample (X- TC-Helicon GoXLR). This will allow you to apply Track Numbers to each audio input and select those specific tracks individually in post production.
Overall, this is an advanced technique and we recommend that new creators stick to the Broadcast Stream Mix for ease when starting. And now you are ready to create content with your GoXLR!
Adding a new piece of equipment to your setup can be a difficult and daunting task. We hope that by breaking down each tab of the GoXLR and discussing what it does, it helps you navigate the app a little better. As well, we hope the additional tips and tricks help you utilize the GoXLR audio interface to it’s fullest extent!
Do you think using audio interfaces in a content setup is worthwhile? Let us know why or why not in the comments down below!
And as always, keep on creating and GLHF!
–
DISCLAIMER: Links included in this article might be affiliate links. If you purchase a product or service with the links that we provide we may receive a small commission. There is no additional charge to you! Thank you for supporting our blog so we can continue to provide you with free content!