Let’s start off by watching a quick video together, here. Just open that up and let’s watch the first 19 seconds (make sure your volume is lowered).
Did you watch it? Great! (Sorry about your ears). As you can hear and see, audio plays a major role in any piece of content, whether it be streams or video. Yes, it’s funny to listen to the distorted screams of a Warzone win or rage as someone gets sniped from the map. That said, try listening to a stream like that for more than 5 minutes. It’s probably impossible for most of us. This could, unless you are a memelord and thrive on distortion, push potential viewers away from you.
Many individuals that are perusing Twitch and YouTube are looking for a place to chill and watch fun gameplay. Subconsciously, these viewers are probably looking to also find someone they can consistently watch. Will they want to watch you with audio like that? When you go live or put a video out, you always want to put on the best show possible. Getting your audio squared away is just as important as a lag free stream or a 1080p+ video. So today we are going to look at everything audio, from the microphones we suggest, to some basic settings that will make you sound glorious. Let’s get into it!
USB Microphones
The first step to enhancing your listening experience is to use a good microphone. You can totally use your headset microphone and call it good. In fact, huge streamers like Tyler1 and DrDisrespect (when he’s on green screen) use their headset microphones. However, if you are looking for a clear audio experience, you want to look at getting an external microphone. Unlike traditional headset microphones, where the focus was for communication in-game and not exactly on the quality of sound, external microphones provide a high quality audio recording experience out of the box.
External microphones are build differently from the ground up. Some are powered through USB, while some have an XLR end that you plug into a mixer to work. You’ll want to explore how deep into audio you want to go. Pricing is also key as you can spend thousands of dollars on an external microphone and still have to buy accessories to make it work. A USB powered external microphone is a great and inexpensive way to get started.
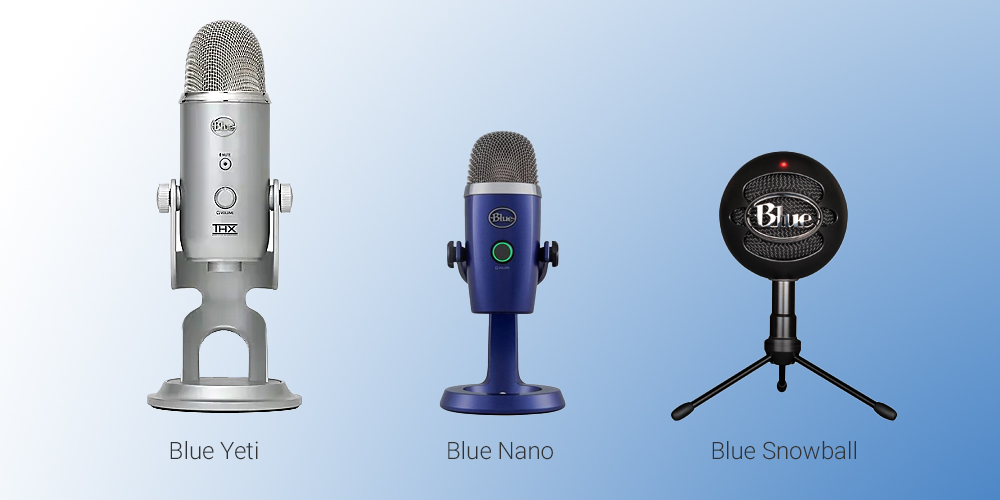
One of the best companies out there creating amazing USB microphones is Blue. Blue, owned by Logitech, is a staple in audio manufacturing for many years. They specialized in microphones for studios and recording artists before moving toward microphones for streaming and video creation. Blue’s microphones are built from the top down to provide some of the cleanest audio available. You also get the plug-and-play experience of USB, which helps avoid having to buy additional equipment to make it work. The best part is that you aren’t paying an arm and a leg for these microphones. The Blue Snowball is around $60 to $70 right now, which is very affordable for a new creator.
If you want something with a couple more bells and whistles, they also offer microphones with pattern adjustments to account for if you are recording just yourself or in a group of people. Adjusting the pattern is nice because if you plan to do a podcast or stream with another person next to you, you don’t have to pass the microphone around to ensure clear audio.
Here are a couple of Blue’s USB microphones we suggest for creators:
- Blue Yeti
- Provides a lot of customization based on the number of people using the microphone at a single time
- Mute button on the front makes it easy to drop audio output
- Plug and play
- Blue Snowball
- Provides one of the best external microphone audio experiences for new creators
- Plug and play
- Inexpensive and provides a super clear audio output.
XLR Microphones
If you want a top-shelf audio experience, you’ll want to look at an XLR microphone. Unlike USB, which connects directly into your computer, an XLR microphone requires phantom power to work. The phantom power connects to your PC directly with some quick adjustments like volume and gain. You can take it a step further and get a mixer which allows for more precise adjustment to the audio from the microphone. While this may be exactly what you want, you’ll have to consider that XLR microphones carry a larger price tag overall. Starter XLR microphones run about $100, but you’ll need to buy quality XLR cables to get the best sound and an audio mixer that goes for about $60 to start, but can get to over $500 on some. Overall, you’ll be looking at an investment of around $200 for a good starter XLR setup.
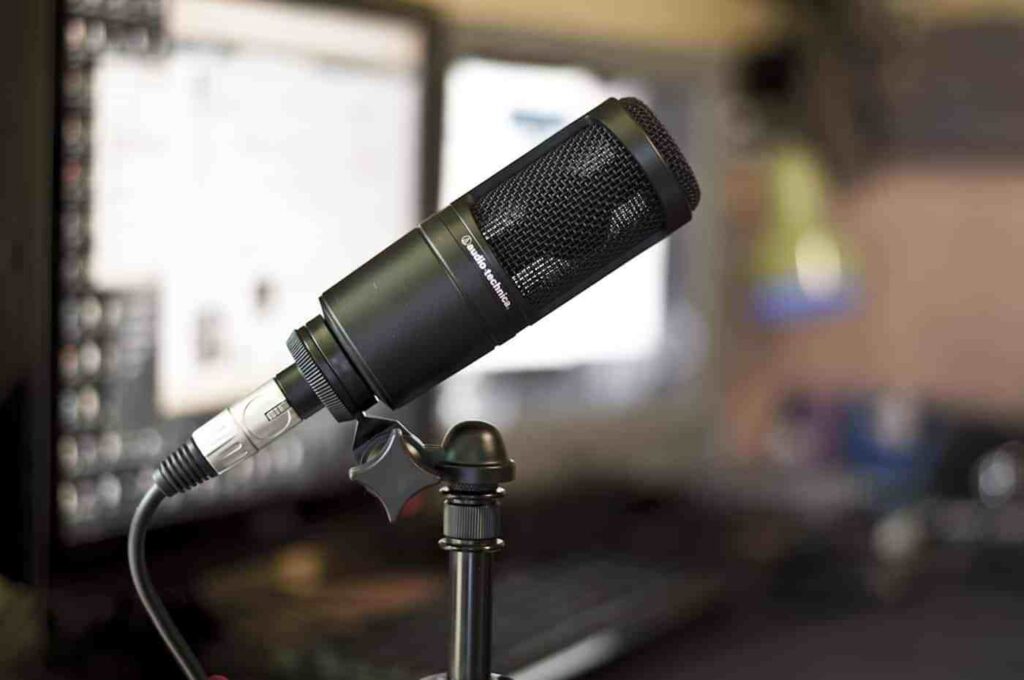
We recommend XLR microphones for individuals looking to upgrade from USB microphones, or for those that need the extra customization and tweaking that you can do with XLR audio.
Here are some XLR microphones we recommend looking into:
- AT 2020
- Provides wide dynamic range to your audio
- Inexpensive for entry level XLR microphones
- Shure SM7B
- Used by many top streamers as their go-to microphone
- Reduces outside sound and electromagnetic hums for clean and crisp audio throughout.
*Phantom power and/or mixers are required to run these. Individuals interested in XLR setups should research what they want to do with this microphone and find the appropriate accessories to make that work.
Audio Drivers
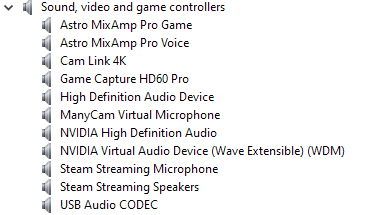
Ensuring that your audio drivers are up-to-date is one of the easiest and quickest steps in ensuring clear audio. Most computer components have software that checks for drivers automatically. If you need to do it manually, follow the steps below:
- Launch Device Manager
- Expand Sound, video and game controllers
- Right click on the device you want to check and select Properties
- Click on the Driver tab to check the provider, date and version.
Software Settings
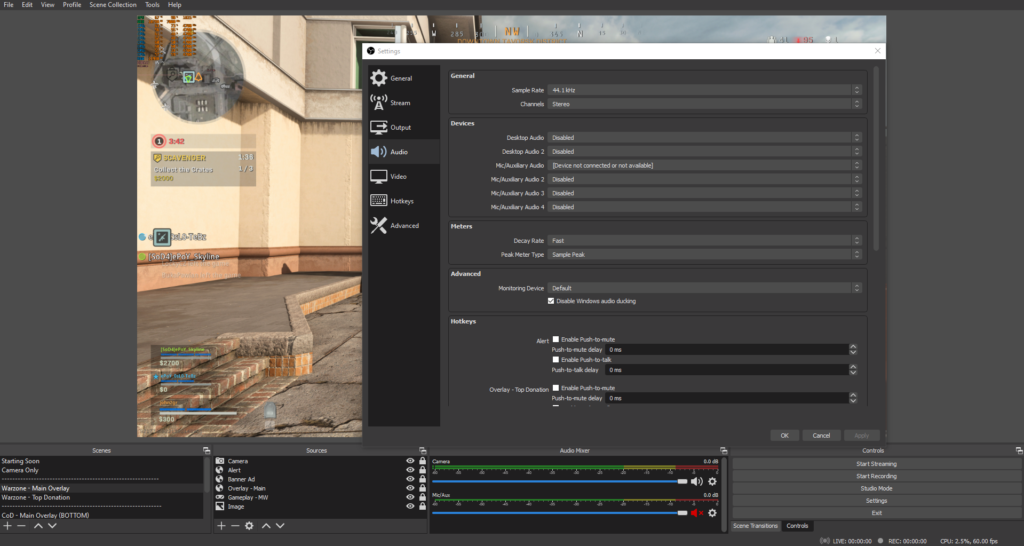
Whatever software you use, it’s critical that you set up your audio mixer and settings correctly for the best experience. We use Open Broadcast Software for all of our streaming/recording needs, but this applies to anything you may use. The key is to ensure that your sample rate, channels, and devices are set up correctly.
You want your sample rate to be between 44.1 kHz and 48 kHz. We recommend that for most individuals, you use 44.1 kHz. Why not 48 kHz? Well, it’s actually about saving your resource power. Humans are unable to hear the difference between 44.1 kHz and 48 kHz. You are saving some CPU resource by using 44.1 kHz. Moreover, file sizes are obviously smaller between the two in case you are recording for a video. Typical CDs are recorded on at 44.1 kHz, so you should be just fine using that for your content. If you feel like resource power management isn’t an issue, feel free to bump it up to 48 kHz if you’d like.
Channels are the second piece of the puzzle. You’ll want to make sure it’s set to Stereo. The reason for this is because it provides sound source localization. To put it simply, your brain is able to be tricked into thinking that a barking dog is behind you or that someone whispered in your left ear. It adds width and depth to the audio with multiple channels. Mono audio has all audio sources on a single track, so you can’t distinguish where a sound is coming from.
For your devices, you want to make sure that you set your microphone and desktop audio devices in the audio settings. Within OBS this does two things: First, it ensures that the correct devices is being used for supplying audio. Second, the Audio Mixer on the front screen gets populated with the devices. An added benefit to doing is that you are able to ensure only one track of that device is active. If you have multiple tracks of the same audio source, you may get distortion and echoing.
You can adjust all of your audio settings in OBS by doing the following:
- Open Open Broadcast Software
- Select Settings at the bottom right
- Click on the Audio tab on the left sidebar
Getting your audio situated is key to a great stream or video. Not only will you have better recordings and streams overall, but your audience will thank you when their ears aren’t bleeding after watching. Most importantly, while this is baseline settings to get you started, there are a ton of other settings you can use to further improve your audio. If you have tips and suggestions that we didn’t cover, make sure to leave a comment below and we might just add it into our article!
Keep on creating and GLHF!