So you’ve made the plunge into the streaming world and decided you want to give it a shot yourself. Congratulations! Now that you made that decision, you have to start creating or having your assets made. Stream assets are any of the visual elements of your livestream. This includes a webcam overlay, an area to show stream labels like Recent Follower or Top Donation, or even a rotating banner with call-to-actions (CTAs) like following you on Twitter or subscribing on YouTube.
Your brand is an extension of yourself and how you want people to view you on your livestreams and on the internet as whole. Therefore, your overlays and graphical assets need to be synced with your brand perception. For some, they rely on graphical artists to make these assets because they are more talented or have a better handle on the design work that is needed. While definitely a great route, this can cost you some money and takes away the unique touch that you bring to the table and what your brand is all about.
For this guide, we want to assume that you are just starting out and don’t want to invest hundreds of dollars into an overlay asset package. If you know some basics of Photoshop, you can get a good looking Photoshop overlay going in around 10 minutes and that’s what we are going to show you today. Let’s make a webcam and stream label overlay for your new stream!
Determine your Overlay Size BEFORE STARTING
The size of your overlay and workspace is all dependent on the games that you are playing, as well as your stream settings. For the majority of streamers, they aim to have their streams running at 720p 60 FPS or 1080p 60FPS. This is your max resolution and your max frames per second that your stream will be broadcast at.
If you create your overlay at 1280 x 720 resolution in Photoshop, but decide later to stream at 1920 x 1080, the assets will be sized incorrectly and not fit. Make a decision early on your settings, as well as how you want the overlay to generally look to direct you on what to use for your overlay sizing. For this tutorial, we are going to be working at 1920 x 1080 resolution.
Creating the Workspace
Getting started is fairly straight forward:
- Open Photoshop
- Click “File” at the top left
- Select “New”
- A New Document window will come up with options to adjust the workspace width and height. For the width, put in 1920 and for the height, put in 1080.
- In the resolution box below, put 150 (This can go up to 300 if you’d like, but is not necessary).
- Click “Create”
You have now created your workspace where the overlay will live! Nice work!
Creating the Webcam Overlay
Most webcam resolutions are at the ratio of 16:9, but this can be adjusted based on your needs. Some individuals may want a 1:1 ratio for a perfect square. We use a Webaround Green Screen in our content, so we want as much room as possible for movement, while also avoiding clipping. Therefore, we will be using a ratio of 16:9 and our resolution will be 1280 x 720p. Finding your ratio, and by extension the resolution, is key to ensuring that the overlay will fit correctly.
PRO TIP: Get a screenshot of the game you are going to play and place it as the background of the workspace. This will allow you to place the overlay over the image and, when finished, it will sit exactly where you want it when there is gameplay there instead of the image. We are going to use a screenshot of Call of Duty: Warzone.
- Navigate to the Shape Tool and select “Rectangle Tool”
- Click anywhere on the workspace and a “Create Rectangle” window will open up.
- Place the following values in the window:
- Width: 417px
- Height: 234px
- Place the following values in the window:
- Select the Move Tool, click on the webcam box, and drag the rectangle to where you want the webcam on the workspace.
You now have a box that is sized to the webcam and in position to where you want it! We can now create the design!
- In the Layers box, right click on the webcam box that you just made.
- Select “Blending Options”
- Click on “Stroke”
- Place the following values in the Stroke settings window:
- Size: 7px
- Position: Inside
- Opacity: 100%
- Fill Type: Gradient
- Everything else will stay the same
- Click on the Gradient color rectangle and select the colors that you want to use.
- Next to Angle, you can select in what direction the color will fade
- When finished, click Ok
- Navigate to the Layers box once more and select the webcam rectangle.
- Locate “Fill” at the top right of the Layer box and turn it to 0%.
You’ve now created a simple webcam overlay! You want individuals to recognize your brand and associate it with you, so we will place our branding on top of the overlay as the final touch. With that, you are ready to tackle your stream labels overlay! GG!
Creating the Stream Labels Overlay
Showing appreciation on stream to people who donated or subscribed to you is key to building a community. So we are going to make a Photoshop overlay to display that. For most streamers, we recommend making a spot for Recent Followers and Recent Donation. This will cover the majority of actions a new streamer will see. As you open up the options to get subscribers, bits, and large donations, you may want to alter your overlay to reflect that. We will go over more advanced design techniques in a future post.
We want to have the stream labels overlay close to the webcam overlay in this case, but you can put it anywhere in your workspace!
- Select the Rectangle Tool and click on the workspace
- Place the following values in the Create Rectangle window:
- Width: 417px
- Height: 50px
- Place the box in-line with the webcam overlay (If the webcam overlay is underneath the stream labels box, go to the Layer window and drag the stream label box below the webcam overlay layers.
- Right click the stream labels box and select “Blending Options”
- Select Color Overlay and then click on the colored box in the options area
- Choose the color that you want for the background of the box.
- Click Ok.
Next we want to create a smaller box to hold an identifier for the stream labels like Recent Follower or Recent Donation.
- Click on the Rectangle Tool and click on the workspace
- Place the following values in the Create Rectangle window:
- Width: 173px
- Height: 20px
- Drag that new box to the top left corner of the first stream label box.
- Navigate to the Layers area, right click on the new rectangle we made, and select Blending Options
- Select Color Overlay and choose a color background for the box.
- Click Ok
We are almost done! Now let’s add some text to that box.
- Select the Type Tool
- Drag a box over the workspace to begin writing.
- Type Recent Follower and select the font that you want to use.
- Highlight the font and change the color to white. You can find the box to change the font color on the top tool bar.
- While still having the text highlighted, change the font size to 9pt.
- Drag the text box over the small header box.
- Center the text in the box.
You have now made your first stream label box! We just need one more to complete the stream label overlay!
- Navigate to the Layers area and select all of the elements of the first stream labels box. This will include the text, small box, and large box.
- Right click on one of those elements and select “Duplicate Layers”
- Navigate to the Move Tool and with all the elements still selected, drag it below the first stream label box. For more precise movements, you can use the arrow up and down on your keyboard to go pixel by pixel.
- Select the Type Tool and click on the duplicated Recent Follower text
- Highlight the font and write Recent Donation.
- Click the check mark on the top tool bar to save that font.
Congratulations, creator! You have just created your first stream overlay! The final step is to export this to be used into your preferred software. We need the background to be transparent, so will need to turn off the background layer.
- Navigate to the Layers window
- Scroll to the bottom and click the eye icon next to the Background Layer (Do this for the gameplay image if you used this trick).
- Navigate to the top and click File
- Select Export
- Select Quick Export as PNG
- Decide where you want to save the file to
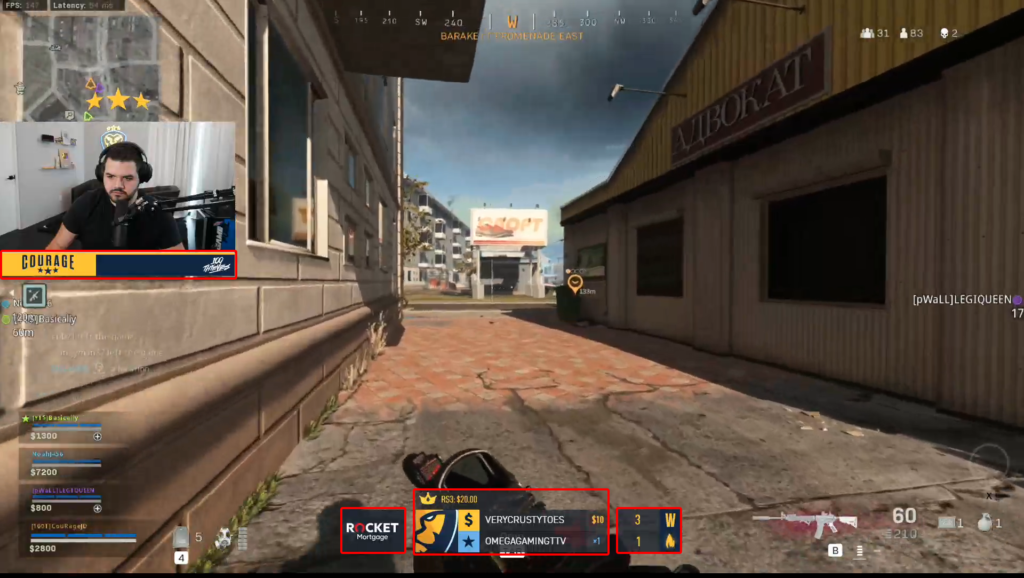
With that, you are done! You can now add the file into your preferred software and add your webcam to it. While we started simple, the possibilities are endless on how you can adjust the overlay. You can move the stream labels overlay to the bottom like Courage, or have a sponsor banner at the top like Dr. Disrespect. By having this initial overlay file, you will know where each piece will sit and can quickly make sure that it doesn’t block any of the important gameplay aspects in the process.
Creating static assets is one way to get started, but Photoshop is just a small piece in the larger scheme of overlay creation. You can take these static images and make them animated and moving with a little editing magic. In our next overlay post, we will explore how to take your overlays to the next level by using Photoshop and a video editing software to create some moving overlay assets for your stream.
Thanks for reading and if you have tips and tricks on creating overlays for new streamers, feel free to leave them in the comments down below! Until next time, GLHF!